Introduction to ESP32
Introduction to ESP32 chips/boards, Arduino IDE/Toolchains, and ESP32 projects.
Introduction to ESP32 SOCs
ESP32
a dual-core XTensa LX6 MCU, capable of running at 240 MHz with 520 KB of internal SRAM, ntegrated 2.4 GHz, 802.11 b/g/n Wi-Fi and Bluetooth 4.2 (LE) connectivity
ESP32-S3
a dual-core XTensa LX7 MCU, capable of running at 240 MHz. Apart from its 512 KB of internal SRAM, it also comes with integrated 2.4 GHz, 802.11 b/g/n Wi-Fi and Bluetooth 5 (LE) connectivity that provides long-range support.
ESP32-C3
a single-core Wi-Fi and Bluetooth 5 (LE) microcontroller SoC, based on the open-source RISC-V architecture.
ESP32 Interfaces and Peripherals

ESP32-WROOM-32
Insight Into ESP32 Features & Using It With Arduino IDE
Features:

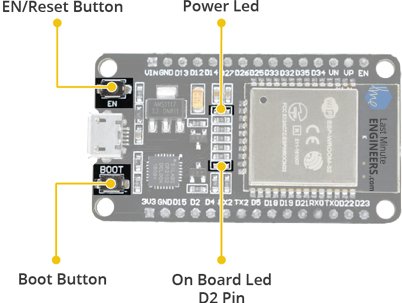
NodeMCU-32S pinout

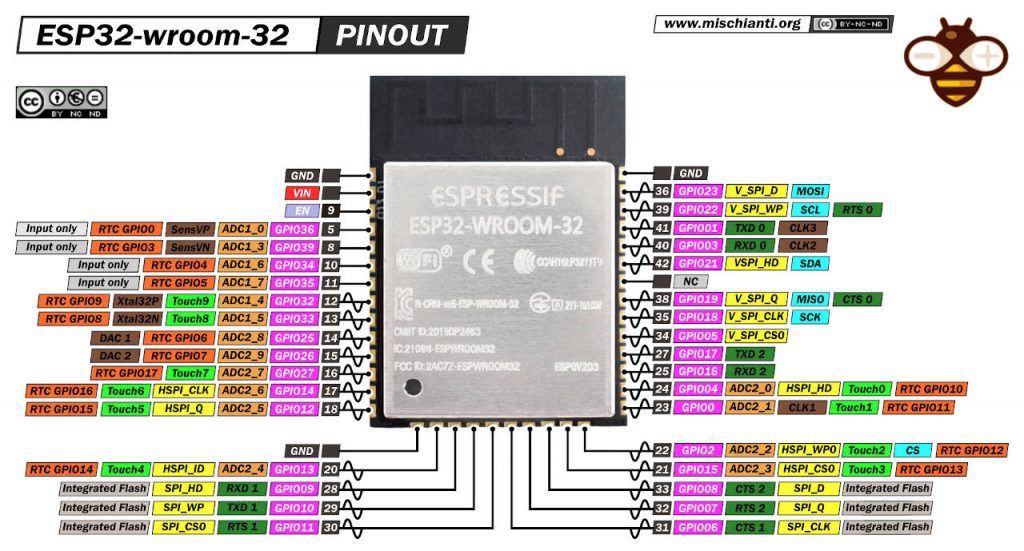
ESP32-WROOM-32 pinout
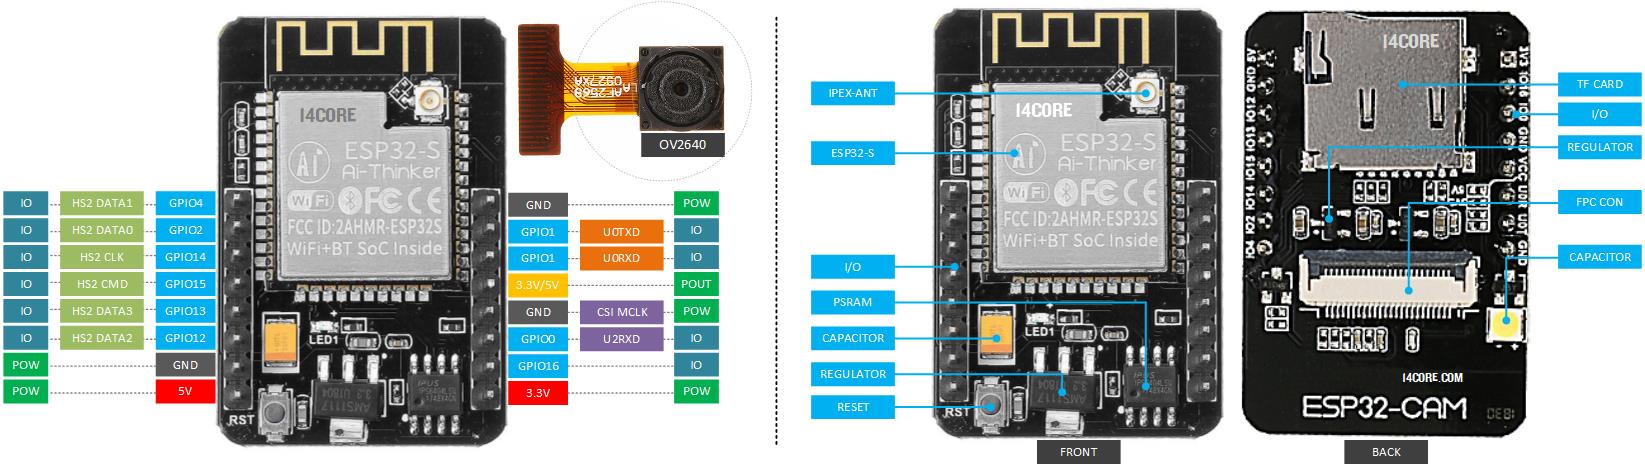
ESP32 CAM pinout

 ESP32-CAM upload code
 ESP-WHO (face detection and recognition)
ESP32-CAM video streaming face recognition
ESP32-CAM video streaming Web server
Code: ESP32-CAM Web server
EPS32 IDE / Toolchains
https://github.com/espressif/arduino-esp32/releases/
ESP32 Arduino IDE

- Download Arduino IDE, then Install on PC
- Run Arduino
- Files>Preferences>Setting> URLs =
https://github.com/espressif/arduino-esp32/releases/download/2.0.5/package_esp32_index.json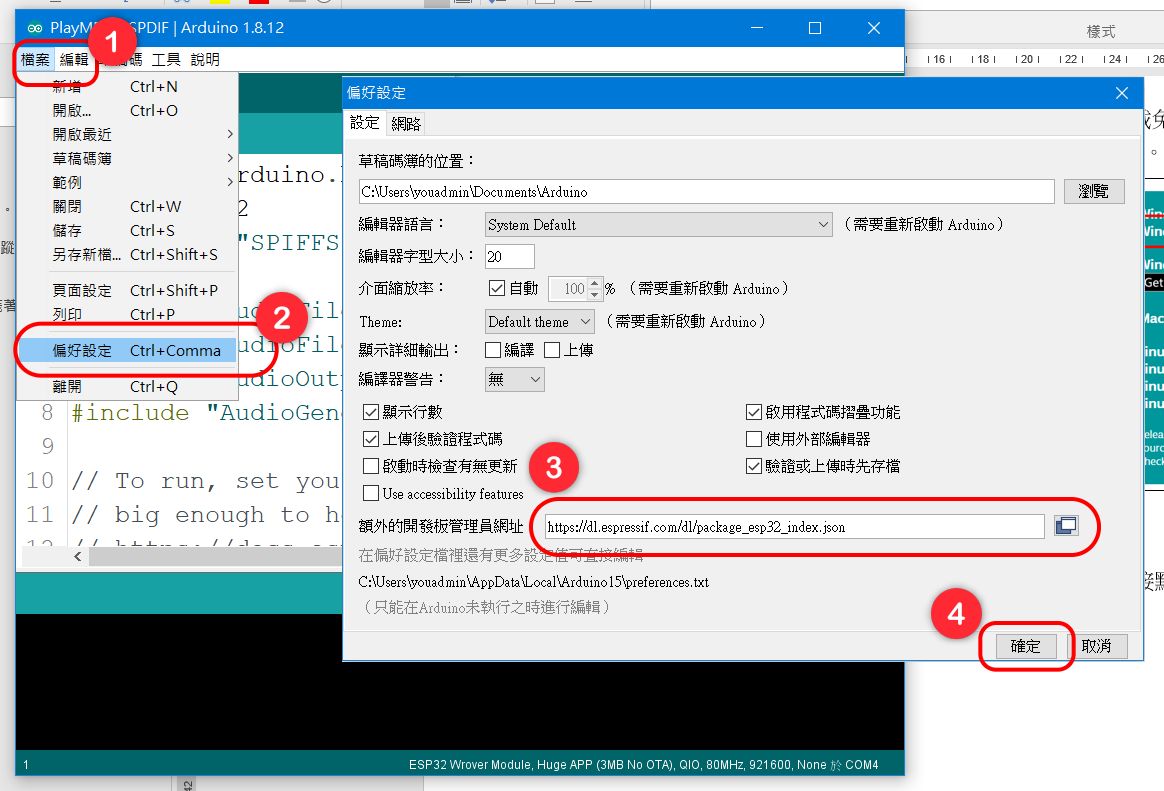
- Tools>Board>Board Managers>ESP32 Arduino> select
NodeMCU-32S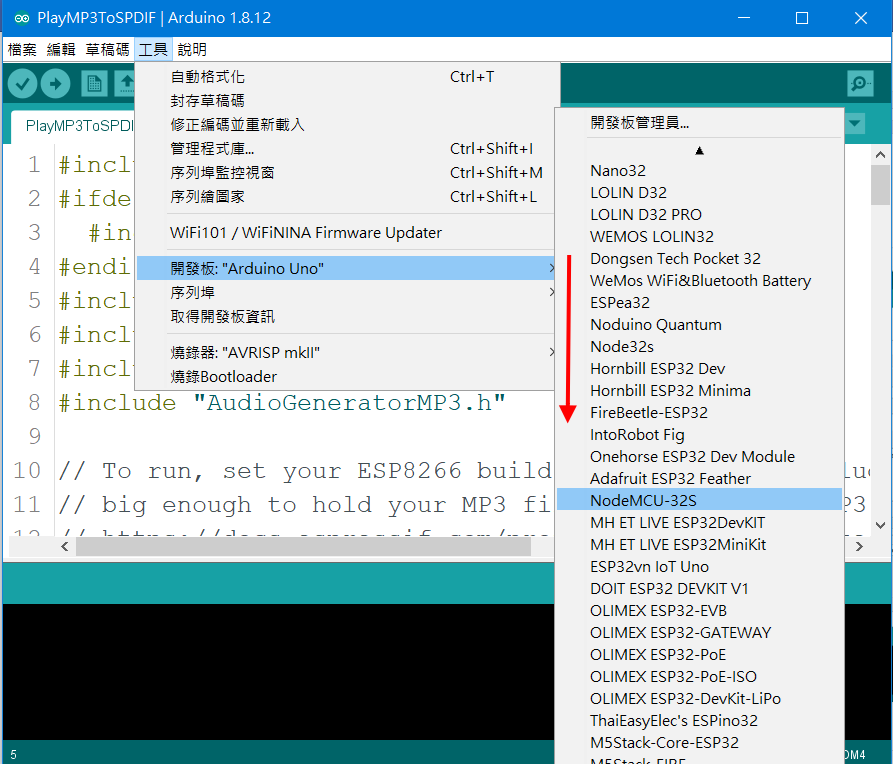
- Tools>Port> select
COM3or/dev/ttyUSB0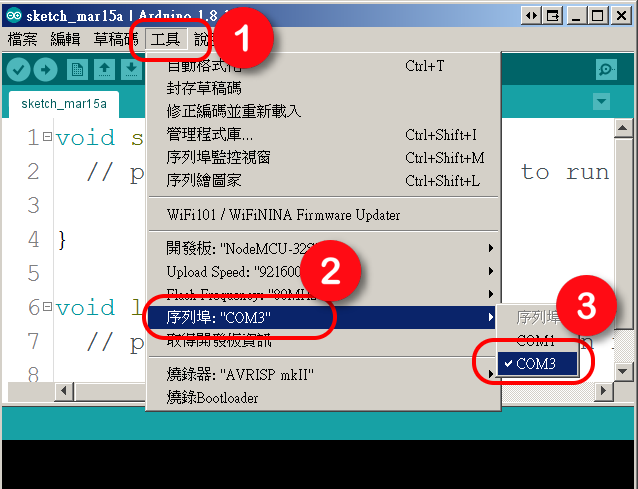
- Tools>Manager Libraries…> search packages to install
- Sketch>Include Library>Add .ZIP Library…
- Download Sample Codes (click
Code, then selectDownload ZIP) - Uncompress arduino-master.zip, store
samplesfolder to ~/Documents/Arduino/ - File>Examples> select
01.Basics/BlinkytoVerify, thenUpload - Press on IO0 (BOOT) button of NodeMCU-32S to upload code
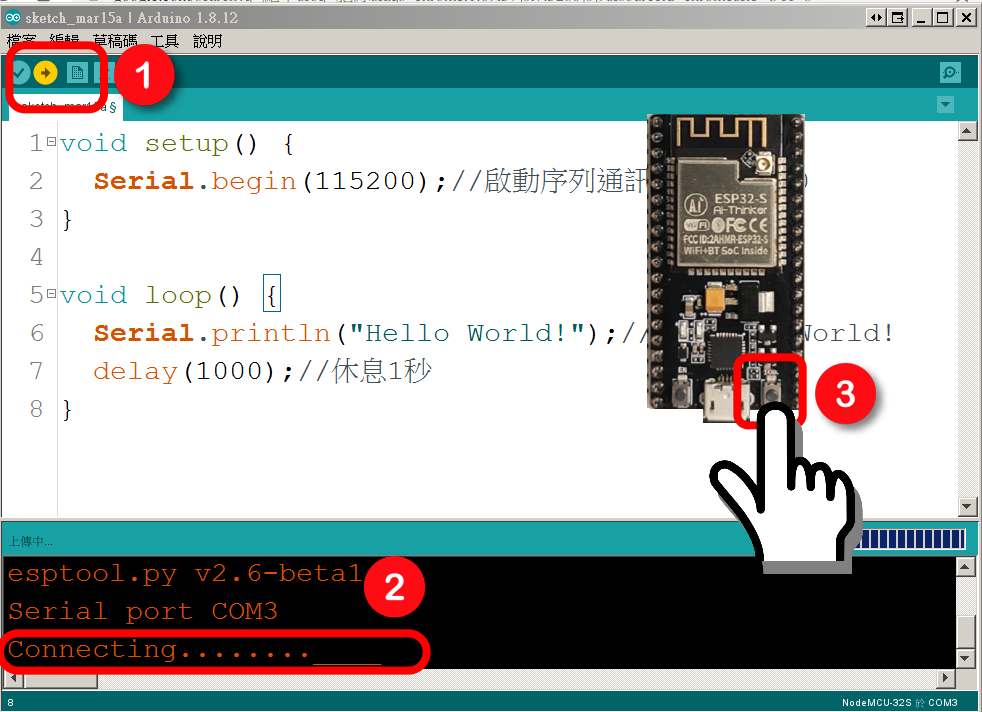
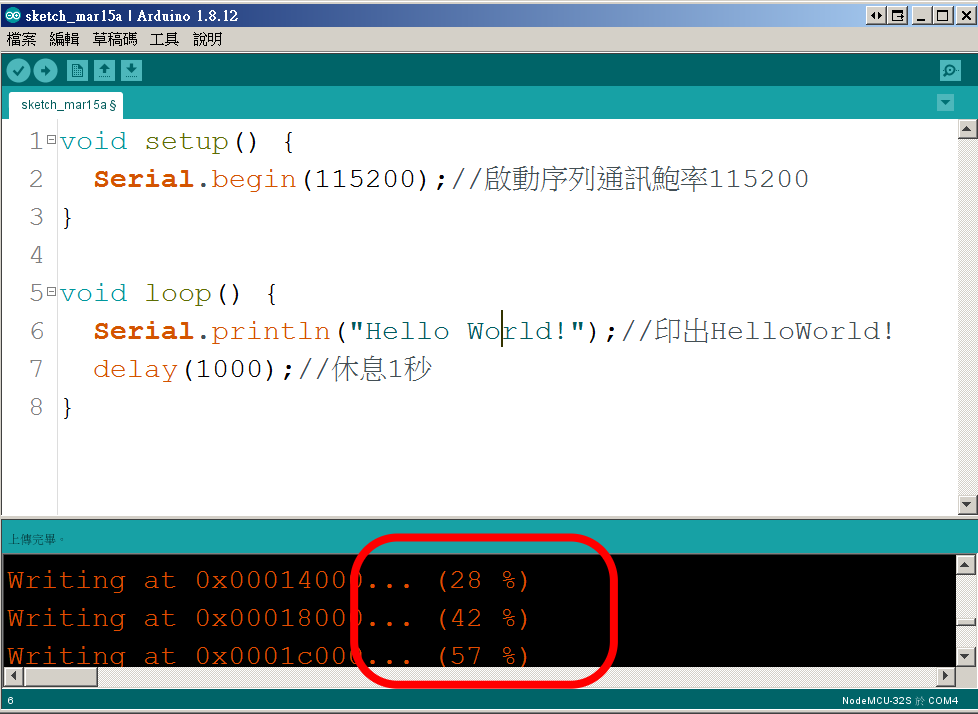
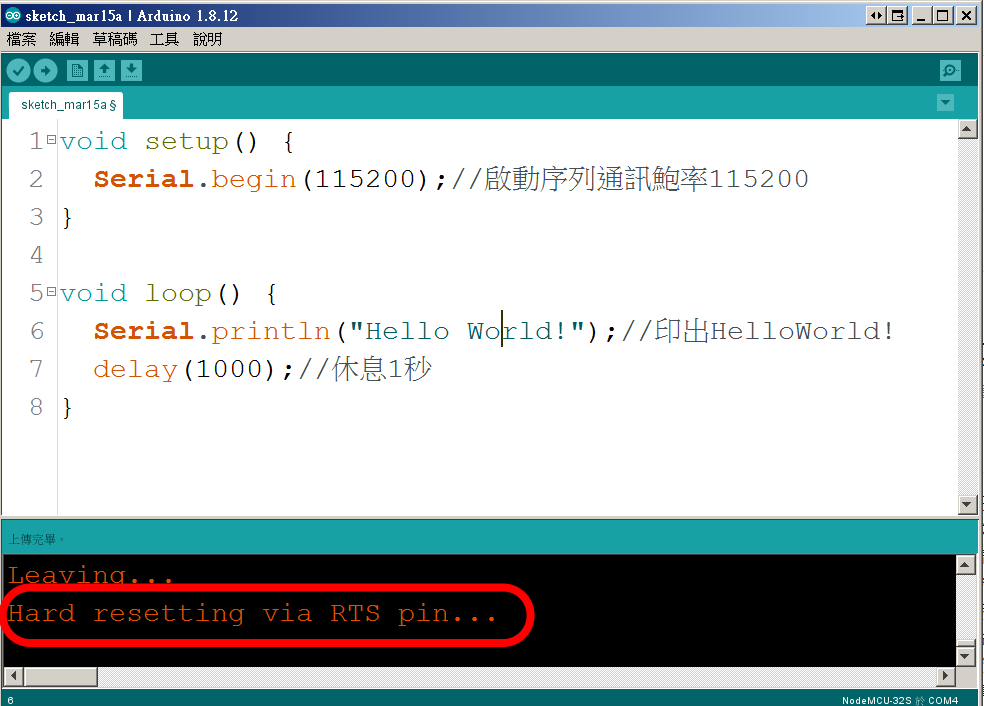
- Open Arduino Monitor

ESP32 Toolchains
ESP-IDF
Standard Setup of Toolchain for Windows
- run ESP-IDF Installer (556.65MB)
- run ESP-IDF Command Prompt / PowerShell
- run batch
cd C:/Users/USER/Desktop/esp-idf>install.batexport.bat
- run menuconfig
cd examples/get-started/hello_worldidf.py set-target ESP32idf.py menuconfig
- build sample code (hello_world)
cd examples/get-started/hello_worldidf.py buildidf.py –p COM3 flashidf.py –p COM3 monitor
ESP-IDF using Visual Studio Code
Standard Toolchain Setup for Linux and macOS
- Install Prerequisites
Ubuntu & Debian:
sudo apt-get install git wget flex bison gperf python3 python3-pip python3-setuptools cmake ninja-build ccache libffi-dev libssl-dev dfu-util libusb-1.0-0 - Get ESP-IDF
mkdir -p ~/esp
cd ~/esp
git clone --recursive https://github.com/espressif/esp-idf.git - Set up the tools
cd ~/esp/esp-idf
./install.sh esp32
For more chips targets:
cd ~/esp/esp-idf
./install.sh esp32,esp32s2
cd ~/esp/esp-idf
./install.sh all - Set up the environment variables
. $HOME/esp/esp-idf/export.sh
-
Connect Your Device
Serial ports have the following patterns in their names:
Windows: names likeCOM1
Linux: starting with/dev/ttyUSB0
macOS: starting with/dev/cu -
Configure Your Project
For Windows:
cd %userprofile%\esp\hello_world
idf.py set-target esp32
idf.py menuconfig
Linux/macOS:
cd ~/esp/esp-idf/examples/get-started/hello_world
idf.py set-target esp32
idf.py menuconfig
- Build the Project
idf.py build - Flash onto the Device
idf.py -p PORT [-b BAUD] flash - Monitor the Output
idf.py -p <PORT> monitor
idf.py -p /dev/ttyUSB0 flash monitor - Erase Flash
idf.py -p /dev/ttyUSB0 erase_flash(need to press IO0 button)
ESP32 Github
ESP-ADF

ESP-VA-SDK
ESP-SkaiNet

ESP-SR
Programming ESP32-S

-
Connect ESP32-S to FT232R, FT232R connected to PC
sudo chmod 777 /dev/ttyUSB0 -
Setup ESP-IDF
cd ~/esp/esp-idf
. ./export.sh -
A2DP-Sink example code(藍牙音箱)
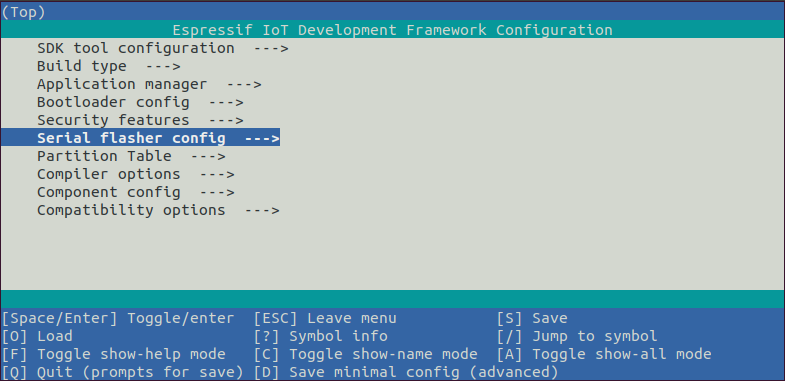
cd examples/bluetooth/bluedroid/classic_bt/a2dp_sink - menu-configure I2S pins
idf.py menuconfig
A2DP Example Configuration --->press Enter
A2DP Sink Output (External I2S Codec) --->
(22) I2S LRCK (WS) GPIO
(26) I2S BCK GPIO
(25) I2S DATA GPIO
press S to Save
press Q to Quit -
Build code
idf.py build - Upload code to ESP32-S
press & hold IO0 button, then press & hold RESET button
idf.py -p /dev/ttyUSB0 flash
release RESET button, then release IO0 button
ESP32 Projects
160+ ESP32 Projects, Tutorials and Guides with Arduino IDE
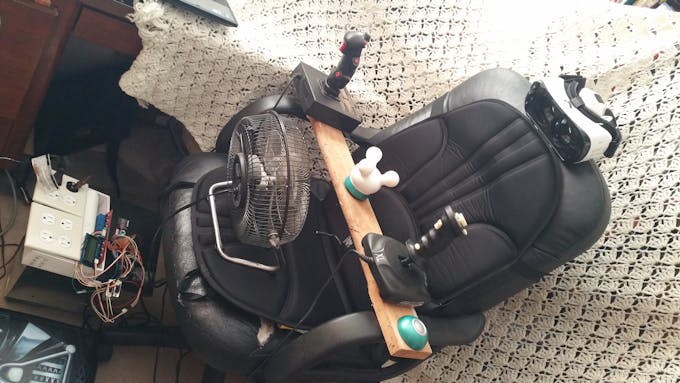
BLE Haptic Dual Joystick Controller
 |
 |
ESP32-BLE-Gamepad
Sample Code: ESP32_Gamepad_Test
Android App: GamePad Tester Lite

This site was last updated June 04, 2023.